
A Practical Guide on How to Use a Theracane Effectively
How to Use a Theracane in a Way that Actually Works
A great tool to use for self-care is the theracane. You’ve probably seen one at a friend's house, or in the fitness section at your local big box store like Target or Walmart. A theracane, or “massage hook” is generally used to dig out knots in a way where you can massage hard-to-reach areas on your body, but oftentimes the recommended diagrams that come with this tool use techniques that are not optimally effective. So the purpose of this blog post is to help you learn ways to use the theracane that are much more effective than the standard “dig and hold”. The concepts used in this blog are based on philosophies from a few different bodywork modalities: active release technique, myofascial release, anatomy trains, trigenics, and proprioceptive neuromuscular facilitation. Once you master the general concepts of these techniques, you can apply them to any muscle. I am also writing this blog as an outline for my “theracane series” on YouTube where I will demonstrate all of these different techniques on all of the areas of the body. Subscribe to my channel to stay up to date on the continual development of the video playlist.
General Tip: “Static Pressure Vs. Cross Fiber Friction.”
For the contents of this blog you will need a theracane. Rubber bands/resistance bands, or duct tape are optional. For the final advanced technique you will need a set of resistance bands that you can anchor to a door, or a sturdy pole in your home [not the resistance bands that are circular and form a closed loop unless you’re really crafty (I still haven’t figured that one out yet)].

I suggest that when you do these techniques start with static pressure on the contact point with the theracane. That means press down and hold in one place. This approach is less invasive for starting. Feel free, unless indicated otherwise, to add “cross fiber friction” to any technique by wiggling the contact point of the theracane around perpendicular to the muscle fibers while you do these movements. Oftentimes cross fiber friction works best if you are directly in contact with your skin versus being on clothing that will make the tip of the cane slide. I like to put some kind of rubber band around the end of my theracane to make sure this slipping doesn’t happen. Another trick if you don’t have a rubber band would be to place duct tape around the end and let it sit in the sun for a day or two, and then remove the duct tape and there will be left over glue to create more traction. But this effect is only temporary and can make your theracane look kind of disgusting.
Beginner: “Shorten, Trap, and Stretch.”
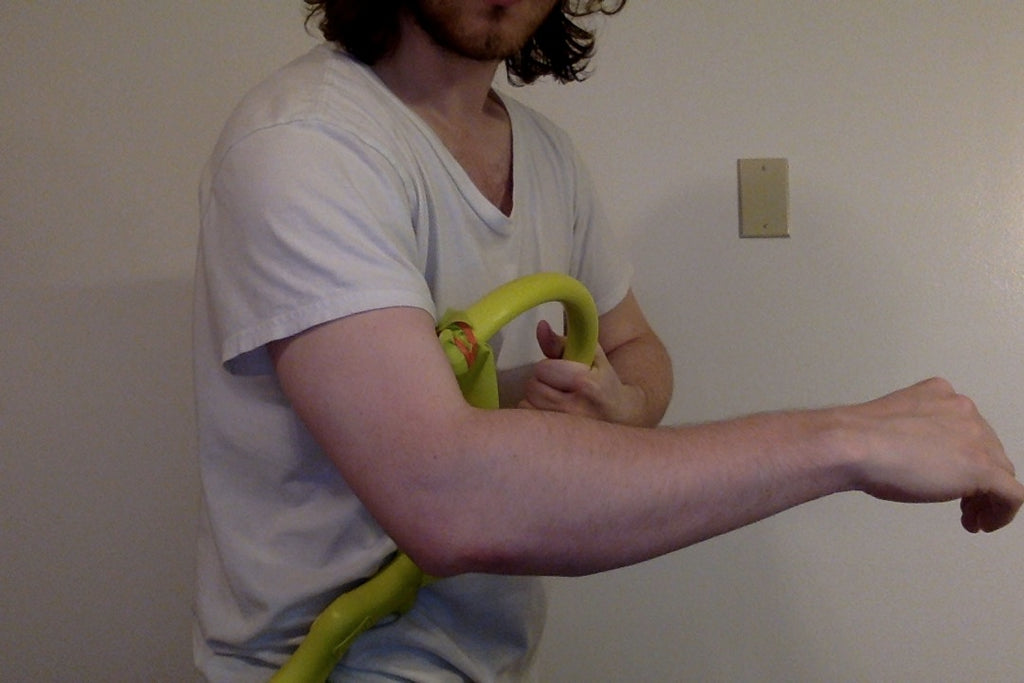
Our first technique is what I like to call “shorten, trap and stretch”. It’s very simple. You figure out what muscle that is sore or tense, and shorten it. If it were your biceps brachii muscle in your arm, you would bend your elbow. If it were your triceps muscles, you would straighten your elbow. After you shorten the muscle, you then fenaggle and figure out a comfortable way to place the end of the massage hook on the shortened muscle and hold static pressure. Once you have the muscle shortened, and trapped, you then lengthen the muscle. With the biceps that would mean bending the elbow, trapping the muscle, and then straightening the elbow. With the triceps that would mean straightening the elbow, trapping the triceps, and bending the elbow to lengthen/stretch the triceps. Repeat this in several places along the entire belly of the muscle from tendon to tendon.

This concept can be applied to any muscle in the body as long as you know what direction to move the joint to shorten the muscle. As a general rule, shortening the muscle will make it softer.
Intermediate I: “Lengthen, Trap, & Move the Chain”
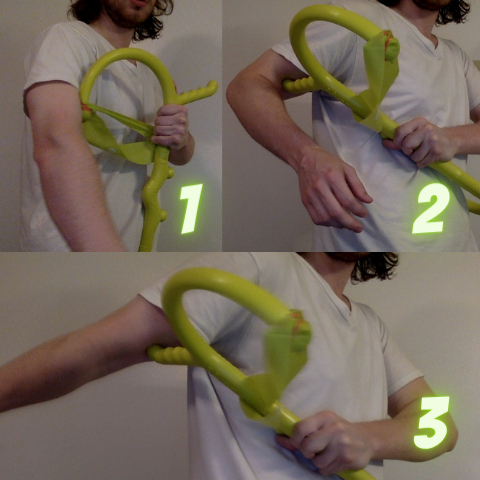
This technique is very similar to the first, but takes a more advanced understanding of the “myofascial meridians” to apply. But you can think of it in a more simple way. “Chain” refers to kinetic chain, or myofascial meridian. A kinetic chain describes different muscles that synergize and stabilize your extremities through the contraction of what’s referred to as the agonist muscle, or Prime mover. When you bend your elbow, the agonist muscle is the biceps, the stabilizers are the muscles of the shoulder, and the synergizers are the muscles in the palm side or thumb side of the forearm. But essentially the only difference between this technique and the former technique is that you lengthen the target muscle instead of shortening, and you move the joints above and below the target joint/muscle. So for the biceps you would straighten the elbow, and rotate the forearm, bend the wrist in different ways, or hyper flex the shoulder (move the shoulder behind your body but still down at the side.) If I could put this more simply, I would say, “lengthen the muscle and move the other joints of that extremity in many directions until you find a direction that has a therapeutic effect”. That applies to the leg, and spine. If you were to do this on your hip, you would trap to spot on your gluteus maximus, and move your hip to a different position and move the ankle or knee. For the spine you would trap a place on your spine and bend over, or rotate the spine. This technique is more improvisational, but it definitely holds more potential for impact than the proposed methods from the silly booklet your muscle hook came with, if it came with one at all. Use static pressure first, if that doesn’t work well apply cross fiber friction.
Intermediate II: “Lengthen, Flex, & Dry Glide”
The “lengthen, flex, and glide” technique borrows a concept from anatomy trains and is also applicable to foam rolling. With the target muscle in the long position, slowly (and I mean extremely so) drag the head of the theracane over the skin while activating the target muscle. This works more to pull the different levels of the fibers apart. Another way to say that is, the superficial muscles (closer to the skin) will peel off of the deeper (closer to bone) muscles. Go with the grain of the muscle, not across. When dragging the head of the cane press and move slowly in a way where you’re more so following.

Advanced: Lengthen, Resist, & Pulverize.
This is by far the most effective, and my favorite of all of the techniques. However, this technique takes a more advanced knowledge of muscular function and myofascial meridian anatomy. It also involves the use of an extra tool: resistance bands that you can anchor to a door or a pole in your home. I have also found this technique to be more effective with a massage gun, or “theragun”, but I have included it in this series just in case you don’t have a hundred bucks lying around for a nice massage gun. If you’re using a theracane for this technique I also highly recommend increasing the friction of the end of the cane with some kind of rubber material because the “pulverize” portion of this technique requires lots of grip. This technique also takes a little more time to set up each maneuver so if you want quick relief, that’s what the above techniques are designed for.

Step one is to anchor your resistance band and choose any amount of resistance you have. You can modify the resistance by moving closer to, or further away from the anchor point. The next step is to lengthen the target myofascial meridian (not the target muscle), or kinetic chain. For the line that contains the bicep that means abducting the shoulder from anatomical position 90-135 degrees and turning the thumb forward, and wrist bent away from the forward facing thumb, then extending the arm as far back as possible. The next step is to start using cross fiber friction (or the massage gun) on the front of the shoulder in the pec minor and activate the line at the shoulder with resistance. Do this for at least 7 seconds, keep your arm straight then relax. After you’ve done the shoulder aspect of the chain, shift the contact point to the biceps, and slowly activate the muscle that bends the elbow. You can either simply activate the muscle, or slowly move the joint through part of, or the entire range of motion forward with the action joint. Lastly activate the muscles in the forearm to bend the thumb side of the wrist forward, and use the theracane to cross fiber/use the theragun to percuss the muscles of the forearm. You can repeat this on any part of the line as much as needed, but this is a wonderful experience to observe and embody the connection of these myofascial lines of the body. This process is definitely a lot more complicated, but once you get the feel for it you will never forget it.
It is my goal in 2021 to complete this comprehensive series with a video every Thursday (starting in September 2021) to demonstrate examples of these techniques so that no matter your specific area of chronic pain, you’ll have an answer. I always encourage you to do general strengthening exercises like push ups/chest press, lateral row, shoulder press, chin-ups/(palms facing you) lat pull downs, and a leg press/squats every week. Do heavy weight with slow repetitions and reach momentary muscle fatigue. I will talk more about that next week!
Here is another link to the series.
Thank you for reading!